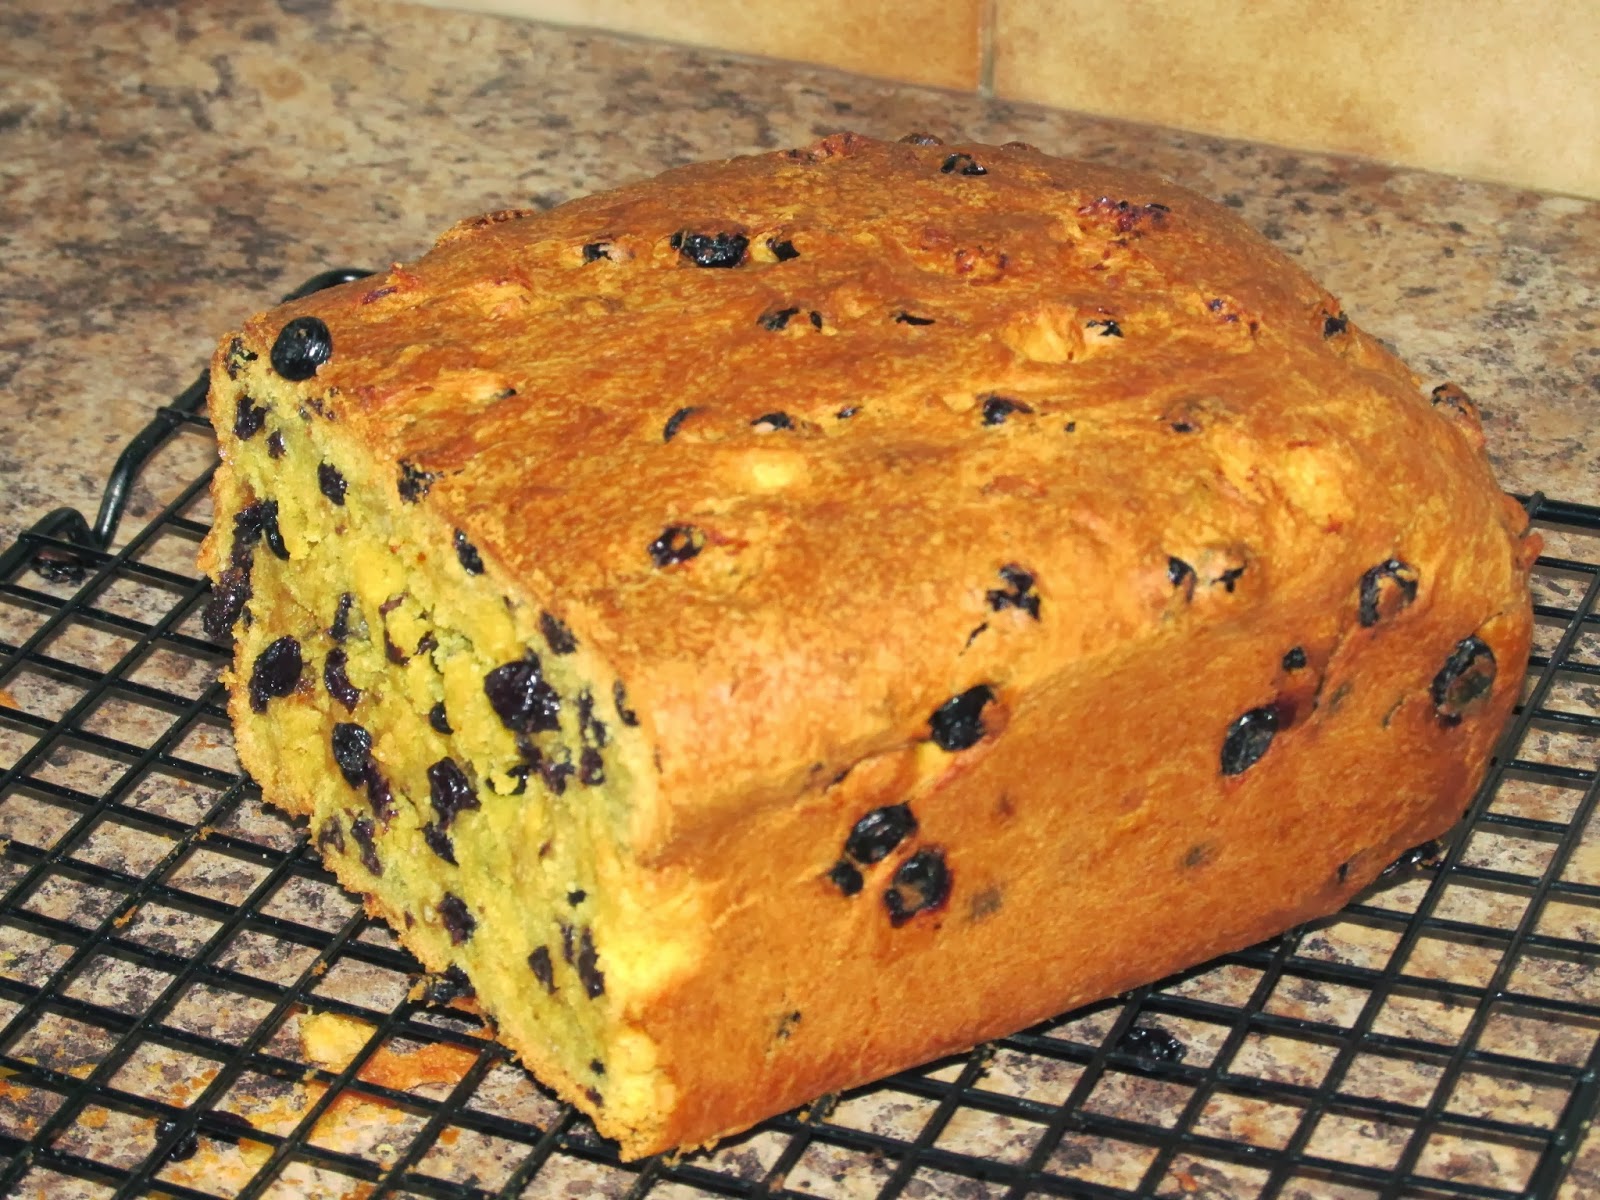
Thursday 28 November 2013

Butternut Squash Wedgies

Let's move away from old Traditional dishes for a week or so. To a vegetable, so common today, that our ancient forebears would not recognise. Potatoes aren’t the only veg you can use for wedgies!  I roasted these lovely Squash Wedgies in Cornish grown Rapeseed oil. Giving them a wonderful flavour, mixed with the spice and herbs. Great with lots of dishes.

Turn the oven on to 190 deg C

1 butternut squash, not too long and fatter.
Good flavourful oil - I used Rapeseed.
fresh nutmeg
dried mixed herbs
Sea salt - I used flakes [kosher salt] 
Freshly ground black pepper


Wash, then cut a butternut squash in half and with a spoon scrape out all the seeds and stringy bits. No need to peel. Cut each half in half, then half again. Brush generously with the oil covering every surface and place in a heavy roasting tin. Generously grate the nutmeg over the squash, making sure every surface has some, then sprinkle with dried mixed herbs. Season well.  Roast for approx 45 mins, depending on size. So easy. I like easy.

Monday 25 November 2013


SAFFRON CAKE

Not long after I started my Blog I made my favourite, grandmother’s saffron bun recipe. I don’t usually make a cake because it goes stale quickly and buns are easier to freeze. But if I am attempting to complete an anthology of Cornish recipes then I must make a Cake. The queen of all Cornish cakes, instantly recognisable as part of Cornish culture and cuisine and much loved by everyone Cornish. Within my trusty 1920s Cornish recipe book there are about ten versions. Most I discard immediately, all have to be halved or quartered as our forebears made huge cakes! In the end I appropriately plumped for the recipe from the Falmouth area.


1 lb 2 oz plain flour
2 oz very finely chopped mixed peel
½ lb currants - I used a couple more oz.
4 oz lard
3 oz butter
2 oz castor sugar 
generous pinch nutmeg
pinch salt
warm milk - about 9 fl oz with a teaspoon sugar
½ oz fresh yeast  [or half sachet dried ie 3 ½ gr].
saffron - depending on quality and how saffrony you want it.

Saffron cakes are denser and heavier than buns. My buns are very light and spongy.
The fat content is far greater here than my bun recipe, the sugar content less too. This should make it heavier and there is about half the quantity of yeast as well. I set about making it.

I wrapped some strands of saffron in some baking parchment and put them in a warm oven for a quarter of an hour. Then, using a rolling pin crushed the dried strands still in the paper, becoming powder like. I then added a few extra strands.

I rubbed the fat into the flour, salt and nutmeg, until it resembled fine breadcrumbs. Then just added the rest of the dry ingredients. Mixing well.

I then warmed the milk and a little sugar to tepid and stirred in the yeast and saffron, leaving it for a while until it started to froth a little. Made a well in the mix and poured in the liquid, bringing it all together with your hand and then tipped it onto a floured surface and began gently kneading until the mix is smooth. Just a few minutes.
Place in a warm spot to prove. Do not expect it to double in size, like bread or the buns.
my book suggested “put a warm plate on it and stand in a warm place until the mixture raises the plate”. That’s all I had to go on!! I left it for a couple of hours, then kneaded again for a minute and put it in an lightly oiled large loaf tin to prove again for an hour.

Preheat the oven to about 180 Deg C. My book suggested 1¼ hours and it took all of that.
But I turned the oven down to about 170 after half the time. The taste test? Absolutely delicious. Quite different from the buns, much heavier, as I thought it would be. The big plus was that it took no time at all. Then the even bigger plus was that the cake was still moist and equally delicious the following day. I don’t know too much about the science of baking but would the high fat content be a factor? I must try it once more as a plain yeast cake!! [I did and it was great!]
Day 3 - the cake it still good. I am so pleased I started this project and found this recipe.


Friday 22 November 2013


Jam Buns


A very simple idea. When I was asking around about recipes that some of my more senior Cornish friends remembered from their childhood, almost all spoke of Jam Buns. I don’t recall ever eating them but my husband did and after my first attempt, he scoffed four before they were cold. I think I may have to keep making them! Nowadays it is all rich cupcakes and heavily decorated fancies, so it is refreshing to see such a simple and delicious bun. They are very easy to make and I used a basic Victoria mix.

Prepare a bun tin, lined with cases. Turn fan oven on to 190 deg C

4 oz butter
4 oz castor sugar
4 oz self raising flour
2 eggs, beaten
a few drops of vanilla essence [not sure if that was around in the early part of the last C]
Jam of your choice.

Everyone I spoke to, said it was usually homemade Blackberry Jam that their mother’s used. As I have mentioned before, that fruit was free and it was in common use. I used homemade Apricot, mostly because that was already open.

Cream the softened butter, essence and sugar until fluffy then gradually whisk in the beaten eggs. With a wooden spoon beat in the flour.

Using a couple of dessertspoons half fill the bun cases, then carefully make a little well in each. Place half a teaspoon of jam in each well, then cover with the remaining mix. Make sure it is sealed so that the jam does not run out. Do not fill the cases more than three quarters of the way up or they will pour over the sides when rising.

Bake for about 12 minutes, until golden. When cold, I dusted them lightly with icing sugar. Lovely. Simple. Easy. Yummy.

Wednesday 20 November 2013

Traditional Cornish Recipes

Each part of Great Britain has its own unique identity and none more so than Cornwall.
We, who are from Cornish bloodlines are very proud of our heritage and history. And within the category of heritage, lies our food and culinary delights! Pasties, saffron cakes, to name just two.

But in this age of fast food, many of our recipes are dying out and will be lost forever.
I am hoping to halt and preserve a lot of them on my Blog and FaceBook pages. Recipes like Squab Pie. I have yet to post this old recipe and its ingredients are very strange. Where did the old Cornish learn to mix meat and fruit? Why do they use citrus peel in just about everything? Why did they call raisins figs? The generous use of spices too, not least saffron, is commonplace. When was saffron first introduced in Cornwall? Cornish cuisine was the only one in the world that used saffron in a sweet recipe. It is generally believed that it was brought over by the Phoenicians, that great seafaring nation of traders who came to our land over two thousand years ago to mine and trade for tin. They came from the Middle East from what is now Lebanon. If they came over in numbers to mine, as they would have done, then many would have settled, even intermarried and brought over their foods and it is logical that it would have been mixed with our own. I believe that that is the probable root of our peculiar culinary heritage. The Romans invaded our island and were here until the middle of the 2nd C and within their ranks would have been soldiers or mercenaries from all over the Mediterranean. Could these also have been contributors to our culinary history?

For centuries saffron was grown in Cornwall, as it was known to be an improver of land and would grow in indifferent ground. It was harvested in September, after a dry summer. Twice a day, three or four blades from each blue crocus flower would be gathered for the month, then dried. In the late 1600s an acre of land could yield between £40 - £50 worth of saffron and that was a lot of money!

A Squab was a pigeon but the bird was substituted by veal or lamb in the Pie recipe a long time since. Apparently cormorants were sometimes used as well and they were very tough! But the Squab Pie epitomises the use of middle eastern ingredients with our own. Layers of mutton [lamb], with apple, dried fruit, sugar and onion made into a pie.

Pastry rolled out like a plate,
Piled with “turmut, tates and mate.”
Doubled up, and baked like fate,
That’s a “Cornish Pasty”.

The pasty has been around since the late 13thC at least and probably long before that. The pasty seems to have been eaten by rich and poor alike, except the wealthy would have used ingredients like beef or venison or even fish and the poor working classes filled theirs with cheaper ingredients like potato, onion and turnip [swede]. But it was another 300 years before the pasty was in general use, by farmers and miners alike. Easy to carry and eat, the pastry held the filling together and sustained the worker throughout the long working day in the field or mine. But not at sea! It was supposedly bad luck to take a pasty out to sea. It would probably have been sometime in the early 1800s before beef and vegetables merged and the pasty as we know it today was born and by the beginning of the 1900s pasties were started being produced commercially on a huge scale.

When mining was at its heyday whole families often worked in the mine and mother would mark each pasty with an initial to show who it belonged to. [my mother did this and we did not work in a mine!] The pasty was held at the bottom by the crimping end joint, which would have been discarded, as the arsenic would have transferred from the miners hands. Many mines had large ovens where workers placed their pasties at the start of their day, then the shout of “Oggie Oggie Oggie” would signal croust time [lunch]. Their Oggie [the old colloquial term for a pasty] was eaten at the corner furthest from the initial, so if there was any leftover, then the owner could claim it later! Miners also reheated their pasties on shovels if there were no ovens!

I do not think there has ever been found an ancient written down recipe for a pasty as it was passed down by word of mouth, daughter’s watched their mothers make them and so on… It is said some pasties held savoury on one side and fruit on the other? Maybe! I do not know. How would they have kept the flavours apart without them merging? Or could the legends have sprung from early attempts to mix the flavours, as in Squab Pie? Pasties are part of our culinary heritage, part of our daily life and we love them!

I posted the Cornish favourite, Heavy Cake early on in my Blog and that is steeped in myth as well. But after much reading and research I think it stems from the fisherfolk, especially in the west of our county. Whole families would be summoned to the beaches to haul in the nets of herring and pilchards. Womenfolk needed to make a quick dish when they finally got home and could not wait for the yeast to rise, so left it out and the Heavy Cake was born. Does Heavy mean weighty, because there is no rise in the dish, or is it named after the hauling shout of ”heave”? I think it is the latter. But even this is full of the eastern Med ingredients of peel and currants. The crisscross design on the cake resembles a fishing net and for me is the biggest clue as to its origins.

Does anyone reading this have anything to add - or take away? I am open to ideas and would like this little essay to be as authentic and complete as possible, so I am making this a first draft to be amended at any time!! Lets make this a joint project!
Comments please, and email me lauriemburley@gmail.com

Tuesday 19 November 2013


Pasty

As promised I have made a “real” Pasty [and variations] instead of my usual Pasty Pie. My husband and son in law are delighted!!!

The ingredients are the same as the Pasty Pie, as is the pastry, So I will not repeat myself by telling you how to make the crust. It’s all on my Blog, along with loads of pics. I stopped and cleaned my hands as often as possible to take photos at every stage to help those of you who have never made one! The three pasties I made [2 large 1 small] used the pastry mix. ie 12 oz plain flour, 3 oz lard and 3 oz marg. Salt and a little very cold water.
You will realise the pasties are pretty large but my husband would think I had lost my marbles if I gave him a small one - ditto son in law.

Swede - chipped finely [smaller than for the Pie]
Potato  - ditto
Leek - quartered longwise and sliced
Onion, finely chopped.
Skirt beef, finely chopped. 
[Pork too. I used one large pork loin steak and left the small amount of fat in]
Sea Salt and freshly ground pepper
Plain flour to dredge.
Generally parsley too, but I forgot to buy it!! It’s fine without!
Colloquially, when parsley is used its a grass pasty!

As a child my mother made pork pasties too and they were delicious, so I have made one of those too!! I have been asking around about variations and many folk remember fondly mashed potato pasties!!! Seventy or eighty [or more] years ago lots of folk could not afford skirt regularly and if you had to feed a growing family…. So I thought I would try them as well. I mashed 2 potatoes with a little butter, then stirred in a very finely chopped and fried shallot [in flavourful rapeseed oil], S&P and a little grated nutmeg. This is my version but I cannot believe that our forebears would not have used onion and the commonly used spice, to add flavour.

Before you start, take the pastry out of the fridge for about 20 mins before rolling.
Assemble all your prepared ingredients around you and turn the oven to very very hot.
This sets the pastry then there is less chance of it coming apart - or smiling! Grease a baking tray. Then start.


Roll your pastry out to the approx size you want, rolling evenly and making sure the edges are even and not thin. Brush the whole of the outside inch with a little beaten egg or milk. As in the photos place a rolling pin halfway under the crust to give you the sharp D edge. Assemble in order, swede, potato, leek, meat, onion, parsley, flour.
I season well at least twice, once about halfway through and again on top of the onion.
Twist the whole pasty so the D is in front of you and close over so the edges are meeting. Press together then take the pin away. Crimp. Lift onto the prepared baking tray, put a little whole in the top for the steam and brush with beaten egg or milk. The egg is shinier.
Bake for about ¾ hour to an hour, according to size. After the first ten mins turn the oven back to about 190 Deg C.
I hope the photos explain every stage. Good luck, if you have never tried them before.
I loved the mashed potato pasty - great for cocktail pasties and a canape. Thanks to Joyce for her reminisences. Make sure the mash is cold before you add it to the pastry and bake for a shorter time.


Saturday 16 November 2013


POTATO CAKES

There are so many methods for these little gems and after much studying of my old Cornish recipe book I am still none the wiser!  Some recommend baking in the oven while others suggest using a griddle or pan - one even says you can use a biscuit tin lid over the open fire!!! But after several efforts I can emphatically tell you they are best when done in a pan or griddle.

It is amazing how a few ingredients can have so many methods! So I am plumping for the most obvious - to me anyway. The flour and fat should be rubbed together, [like shortcrust] before adding to the potato, you are making a “cake”.

Take:
6 medium potatoes, peeled, boiled, then mashed with a little milk or preferably buttermilk.
Seasoning. By now you must know my preference for Sea Salt flakes [Kosher salt] and freshly ground pepper. [I always use a mix of black, red, green and white]

6 oz plain flour
3 oz butter [do not even think of using marg - yuk]
A little seasoning as above.

Allow the potato to cool completely. Rub the fat into the flour. Add finely chopped parsley if you wish.
“Modern me now adds, that a touch of fresh grated Parmesan would be great too!!”

I love herbs!! And so did our forebears. So I am sure they would often have added parsley. Bring everything together and gently roll to about between ¼ and ½ inch thick, on a floured surface, then using a cutter make the cakes. I used a 3 inch cutter and this quantity made 12 cakes. After the first batch, reroll the potato mix and cut once more. Use a slice to lift them from the surface to the pan as they will be a little soft.


Heat a large pan with a little oil and butter mix. Then start cooking the cakes. The pan needs to be hot. I reckon the cakes take about 6 or 7 min each side but turn the heat down if they are too brown. How did they manage this on a biscuit tin lid?

They freeze so well, on a flat tray, then bag them up. Reheat in a medium oven for a 10 - 15 mins. They are so versatile and so tasty.

Wednesday 13 November 2013

Figgy 'obbin


Very old Traditional Cornish fare!! Figgys are not figs but raisins and I have yet to hear a plausible reason for why they are called figgys. Once again I worked from my 1920’s recipe book.
“roll out some light pastry, cover with figs and lemon peel, roll up like a swiss roll and make a light pattern on top”


This very simple dish is another example of the Cornish using fruit peel in most dishes!! I was not sure if they meant peel or zest, so I used zest. I also lightly dredged the pastry after rolling, with castor sugar. Not too much, but I remember my mother doing that!!


 Flakey Pastry - recipe below or bought is fine
A little caster sugar
Raisins
Zest of a lemon

Roll out into a rectangle and dust with the sugar, then cover with raisins, leaving an half inch space at the bottom. Cover with the zest of a lemon. [cannot see why it shouldn’t be orange either!]
Starting at the top edge, work your way along, tucking in the pastry to start making the roll. Continue, working evenly and trying to keep it as tight as you can. Seal bottom edge and ends and transfer to a baking sheet. Make slits across the top and I brushed with a little milk.  Bake for 30 mins at 200 deg C

“A notice was seen in a shop window not long since - figgy ‘obbin 4d a lb, more figgier 5d”

Note: ‘obbin is believed to be oven. In ancient times dried fruit was generally used in steamed puddings and such like [more on that soon] but this was cooked in an oven. So easy.

Now - 2 posts in one!! a simple recipe for Homemade Flakey pastry. Have a go, its so easy.


Easy Peasy Puff Pastry

The thought of making Puff Pastry for a Pie Crust/Topping can bring fear to many hearts!! BUT it is so easy if you follow this recipe and a few very simple rules with NO rubbing in, NO rolling out butter between cling film etc.

1] Work in a cold room keeping everything cold. Turn off the CH.
2] Make sure the water is very cold [put ice cubes in it for a bit]

9 oz Plain Flour [all purpose in the US]
pinch salt
6 oz cold butter
few drops of lemon juice
4 oz cold water

Weight the flour into a bowl with the salt. On a floury surface cut and cube the butter, then tip it into the flour, making sure the butter is all covered and separate. Pour in the water then mix together with a knife. When nearly there, change to your hands and bring together, then tip onto a surface. Don’t worry about the lumps, they will be incorporated as you roll. Just very gently kneed for a moment, then roll out into a rough rectangle about 12 x 4 inches. Fold one third into the middle, then the other end over that. Press the edges together and wrap in cling film [saran]. Don’t worry how it looks at this stage. Put in the fridge for 10 - 15 mins. See the photos below for every stage.

Roll out again, always with the “pressed together” edges at the top and bottom facing you, into the same rectangle shape and fold over in the same way. This takes 30 seconds, so you need to be busy with something else while make this Pastry!! Don’t worry either, it will still be lumpy and untidy at this stage. Rewrap, then back in the fridge again for 15 mins and get on making a cake! Repeat this 3 more times. Yes, I know that is more than an hour in total, but you aren’t actually doing anything. No need to be picky either about the timings. If it’s 30 mins, no worries.

Now it is ready to use. A lovely flakey and richly buttery pastry. This will make 2 crusts for small/medium size pies. Cut in half and freeze if you wish. Take out of the freezer the night before you want to use it and defrost in the fridge. Take out of the fridge for 20 mins before using.


Sunday 10 November 2013


YOGURT pot, “all in one” Cake


This cake is so versatile - you can bake it in a shallow square tin or a deeper round one.
I will give you the base recipe, then you can add whatever you want. Fruit, chocolate chips, coffee etc. You can even use a fruit yogurt like raspberry and add the fresh fruit! It is great as a dessert or a lunchbox filler and it is made in less than 5 mins too!! Can’t be bad. My thanks to Kirsten for her fantastic recipe. I used Blueberries in mine.

Prepare and line any tin you prefer. [you do need to line the tin with parchment]
Set your fan oven to 160 Deg C

Take, in a bowl:
A pot of Yogurt.  I used a Yeo Valley Natural Organic Bio LIve Yogurt. 175 grs.
2 pots of Self Raising Flour
1 ½ pots of caster sugar [or light brown if using dried fruit]
¼ pot of sunflower oil or similar
2 eggs.

Mix together. Add whatever you fancy, eg blueberries, then tip into your tin.
Bake for between 35 mins to an hour, depending on how deep is your tin and the size of your cake. I used a 6” round and it took almost the whole hour. Easy Peasey. Yummy.

Note. Lakeland sells brilliant parchment on a roll, about 4 or 5  inches high. Great for sides of tins.

Friday 8 November 2013

BEETROOT TARTE

The beautiful beetroot is related to swede and turnips and evolved from a type of seaweed!! So it is most appropriate that we add it here as a common veg. Most think of beetroot as a pickled salad veggie in a jar, so if you have never tasted it, in its natural state then you are in for a surprise. In Victorian times they even used it as a base for sweets and cakes and it was widely used for its medicinal benefits. My friend Atty, who is Dutch, boils then grates them with a little finely chopped onion softened in butter, a teaspoon sugar, a little balsamic vinegar, salt and pepper and serves as an accompaniment to just about anything. But for now we are making a tarte. I do hope you try this simple recipe.

A great veggie main course or a great side with gammon or steak. YUM.


A bought pack [you need half] of Puff Pastry is perfect for this. Of course you can make your own…..

A bunch of fresh beetroot, boiled until almost soft. 45 - 60 mins, according to size.
They are generally sold in mixed sizes so use the larger for the outside and smaller working into the middle. But this does not work with very large beetroots. See photo for the ones I used. My pan was 9 inch in diameter. You need a pan that will happily go into a hot oven. My handle comes off for such a job. Very handy.


In a medium pan, melt 2 oz castor sugar, just tip it in and spread, and wait...
then add a teaspoon salt [sea salt of course]
1½ oz butter
a very generous splash of Balsamic vinegar
Keep stirring for a minute or two until lovely and dark but be careful you do not let it burn.
Add a generous squirt of clear honey.
Take the pan off the heat and place your sliced beetroots on top, making circles going inwards.
Season with sea salt and fresh ground pepper, plus a few mixed dried herbs.
You could also use chilli flakes if you like a little kick. My husband does not and loves this tarte.

Roll out your pastry - unless it is ready rolled!!! Cut to roughly fit and place it over the beetroot, tucking it in round the edges. No need to be picky. Its underneath!
Place in a hot preheated oven, 190 deg C for 30 mins approx. Cool for a few minutes then, being very careful, place a plate over the pastry then flip over quickly. If you can see lots of juices then it may be prudent to Carefully angle the pan and drain it off first, then pour it back over the tarte when it is on the plate. I do this job over the sink.

Delicious and two recipes on one post!!!!!
Note: It was very difficult to take a good photo with my little camera. We were eating the tarte for our evening meal and the light was poor. The glistening veg shimmered with the flash!! Sorry.

Wednesday 6 November 2013


Cardamon and Balsamic Roasted Turnips.


We Cornish call swedes “turnips”, we call turnips, “turnips” or white turnips. In the US swedes are “rutabaga” and turnips “turnips”. Are you confused yet?

As I have mentioned before I loved veggie recipes and mixing flavours, and here we have swedes and turnips along with the heady flavours of cardamon and gorgeous balsamic.

For 2 generous servings [very easy to double, quadruple etc]


6 oz each of diced swede and white turnips [peeled, diced weight]
Rapeseed oil or a good olive oil
3 or 4 crushed cardamon seeds, shells discarded
1 tablespoon Maple syrup
1 tablespoon Balsamic vinegar
a few crushed red chilli flakes for a little kick
a pinch of nutmeg - always use nutmeg with veggies!!!
Sea Salt [flakes are best] and freshly ground pepper


Quickly blanch the swede in boiling water for 5 mins, add the turnip for the last minute, then drain. Meanwhile heat a baking tray with some oil generously brushed over the bottom. Tip the hot veg onto the tray, toss and bake in a hot oven, about 190 degC for about 20 mins, turning a couple of times.

In a little dish mix all the other ingredients along with another good tablespoon of rapeseed oil and the seasoning. Take the turnips out of the oven and spoon over the mix and put back in the oven for another 15 minutes or thereabouts, turning halfway through. Timing will depend on how small you have cubed your veg.

The smell from the cardamon and balsamic is just amazing and blends perfectly with the turnips. The maple syrup adds just the right touch of sweetness. Don’t forget that swedes take longer to cook than turnips so you need to cook  them for a little longer in the beginning. I could make a meal out of this!

You can easily use all swede or all turnips but I loved the mix of different flavours.


Sunday 3 November 2013


HELSTON PUDDING

As I write, it is Sunday morning my husband is cooking the Roast Pork for lunch and I am prepping the dessert. Helston Pudding is a very old recipe, steeped in the long forgotten past and I am working from my old recipe book, which, for once, has some quantities and timings given!

Butter a pudding basin and prep a saucepan, with folded sheets of kitchen paper in the bottom [to protect the base of the pudding] - that’s not in the book!

2 oz each of:
raisins, currants, suet, sugar, breadcrumbs, ground rice and finally plain flour.
add: 
½ teaspoon bicarbonate of soda
½ teaspoon of mixed spice
pinch salt
milk to mix.
Clotted cream to serve

I decided to use light muscovado sugar and vegetable Atora. I carefully started to add the milk and reckon it takes about 5 fl oz. I used semi skimmed as I did not have whole milk.

Just mix it all together. Very easy. Then tip into your buttered basin, cover with a lid of parchment and foil and place on the folded paper, then carefully pour in boiling water and set to steam for 2 hours, checking periodically the water levels.

I have seen more modern versions with things like chopped dried apricots in the mix, but find it unlikely that our forebears would have used such a luxury item. Of course they would not have used [or heard of] muscovado either!! Castor sugar, I would imagine.

The pudding was delicious and we all enjoyed it! 


Saturday 2 November 2013

SUCK CREAM

Yes, I agree, a most unfortunate name for this old Cornish dessert from the North Coast, Boscastle area. But who am I to change our heritage by renaming it something else, more acceptable to today’s English? 

I took this recipe straight from my trusty 1920s recipe book. It had few method details and no timings and so when I started prepping, I was winging it!

“Boil half a pint of raw cream” [I used Double Cream]
“add the yolk of an egg, well beaten” [small egg, as the original recipe was 2 x the amount]
“2 spoonfuls of white wine”  I decided to go for it and use large ones of Sauvignon Sec!!

A bird does not fly on one wing, my handsome!!

“sugar and lemon peel to taste” Now did they mean castor? I suppose so - I used a level tablespoonful and I grated the zest of one large lemon with a large grater, making bigger bits. Reserve a quarter for top decoration.

“Stir over a gentle fire until it be as thick as cream” . Well I placed all the ingredients in a small pan and gently brought it to a boil, stirring all the while. Then simmered for 7 or 8 mins and checked, it was definitely getting thicker. I gave it another minute.

I decided that was it and decanted the hot cream mix into 2 crystal glasses. When starting to set I sprinkled over the reserved lemon zest.

“Serve in glasses with long pieces of dry toast” Yuk. Dry Toast?!!  Maybe a nice Shortbread?

It tasted lovely. A simple, lightly set, dessert. My husband loved it!