Saturday, 6 November 2021


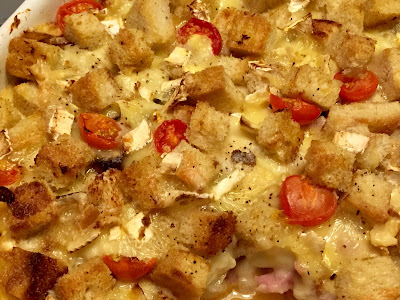
Crispy Cheese and Bacon Bake


Another winner from one of my favourite old recipe books. The brilliant collections from the Farmer’s Weekly. When I saw this recipe, I immediately thought my husband would love it, and of course, I was right.


Note: this old recipe uses marrow, so, before butternut squash arrived in our shops. It seems like they have been a part of our veggie scene for ages, but it is not that long. So, I replaced the marrow for the butternut squash.


Feeds 4 generous portions.


4 oz butter

1 large onion, chopped

12 oz butternut squash, cut into cubes [about ½ inch]

12 oz lean bacon, chopped

6 oz sliced mushrooms

8 oz cauliflower florets

1½ oz plain flour

¾ pint milk

sea salt and fresh ground pepper

4 oz grated cheddar cheese

4 sliced tomatoes

3 large thick bread slices, cubed

8 oz Brie cheese

a little more butter

parsley


Melt 2 oz of the butter in a large pan until quite hot, add the onion and squash and fry for about 7-8 mins.


Remove from the pan and set aside for a mo. Add the bacon and mushrooms and cook for 3-4 mins. Meanwhile, in a small saucepan, simmer the florets until just tender, then drain.


Melt the other 2 oz butter, add the flour and cook off for a minute or so then gradually stir in the milk, add the seasonings and bring to the boil. Take off the heat and stir in the cheddar.


In a large ish dish, layer half of the squash, bacon and cauliflower mixtures, pour over half of the sauce. Cover with two sliced tomatoes.


Now repeat the layers, ending with the tomatoes. Top evenly with the cubed bread and Brie. Dot with butter and place in your pre heated oven for 40 mins.


Sprinkle with chopped parsley to serve.


How wonderful. We all loved it! Serves four generously, even 5. With some crusty baguette.


Easily halved for two. Plus can be made ahead, but increase the cooking time a tad, turning down if browning too much.


Note: using a large hot pan, with a small amount of olive oil, I quickly started toasting the cubed bread, so it would end up lovely and golden.

Sunday, 31 October 2021


Stuffed Mushrooms


It is time I posted a savoury dish or two!!  I just love different and inventive veggie sides and if you have followed me for years you will know how many I have posted. Here is a new one I was serving this summer, although you can vary the ingredients to suit your fridge contents!


For 4 portions


You will need 4 large Portobello mushrooms - or large field ones are great if you ever see them. Use a small spoon to scrape out the brown gills and remove the centre stalk. Be careful not to go through the mushroom itself. Very sparingly brush the outside of the mushroom with a little olive or rapeseed oil. I prefer the latter.


½ a finely chopped red onion

3 large sun dried tomatoes, in oil, finely chopped

Chopped garlic OR [very handy] garlic granules to taste

Sea salt and fresh ground pepper

two tablespoonfuls of stale breadcrumbs 

the scraped out brown gills


In a medium bowl, mix the above together. This the base recipe. You can then add whatever else you fancy….


a little chopped left over chicken, ham or bacon

parsley or chives - or both

½ chopped pepper

chopped courgette

chopped chilli for a kick


whatever…..


Add some grated fresh parmesan and mix it all together along with one egg to bind.


Divide between the hollowed out mushrooms then sprinkle over a little more parmesan and bake in your fan oven at 170C for about 20 mins. Sprinkle over some more parley to serve.


Enjoy! Absolutely scrummy. Trust me. A  great side dish, yes, but is also good as a starter or for a light lunch with a salad.


Sunday, 10 October 2021


Lemon Delicious


A favourite Australian dessert from the 1960s!


Handed to me by my cousin Jan, from Melbourne, when she saw I was having a blitz on lemon recipes. No picture can rightly show how delish and light this dish is! Thank you once again Jan. She tells me her mother used to make it and so does she.


You will need to butter an oblong baking dish and pre heat your oven to 160C. I used a pyrex approx 9 x 6 inches. Serves about 4.


3 eggs, separated

4 oz softened butter

4 oz caster sugar

the juice of 3 lemons and half of the zest

a heaped tablespoon of lemon marmalade [optional]

2 tablespoonfuls of self raising flour

1 tablespoonful milk


In a medium bowl, cream the butter and sugar then add the yolks one at a time. Combine with the SR flour then add the juice, rind and marmalade, slowly.


In another bowl, whisk the egg whites to stiff peaks, then slowly add about a third of the whites until well combined then add the remainder.


Pour the mixture into your baking dish and set in a deep sided water bath. [I used a roasting tin]


Bake for about 40 mins until golden then serve dusted with icing sugar, cream and/or ice cream.


Can be eaten chilled but warm in winter is DELICIOUS! Oh my!


Sunday, 3 October 2021


Lemon Mousse Sponge Flan


Well, you all know how I love old fashioned recipes and this comes from the old Farmers Weekly collections and was actually submitted by a Mrs Marris of Tregony. You do need a 8” sponge flan tin and I dug deep in the back of a cupboard to find mine. I never threw it out when I had my new kitchen and I cannot recall the last time I used it. Lucky!


Generously butter the tin and sprinkle over some caster sugar, tossing it around then discard the excess in your sink. Pre heat your fan oven to 200C


Sponge


2 eggs

2 oz caster sugar

2 oz plain flour


In a medium bowl, whisk the eggs and sugar together until really thick and creamy. Sieve the flour over the mix and gently fold in. Tip into your prepared tin and bake for 10 mins. Cool in the tin for a short while then invert onto a rack when cooling.


Filling


2 medium eggs

the grated zest and juice of a lemon

1 tablespoonful caster sugar

scant ½ oz of powdered gelatine

2 tablespoonfuls hot water


Separate the eggs, adding the zest to the yolks and whisk until light and creamy., then add the juice. Whisk the egg whites to stiff peaks.


Dissolve the gelatine in the water and cool then stir into the lemon mix. Fold in the whites until evenly combined then pour into the flan. Leave to set.


To decorate or not to decorate?…. decisions decisions. Or just serve with a generous dollop of clotted cream. Or ice cream even.


A super easy, delish make ahead dessert. Yes, it is very 1960s but nothing wrong with that!

Wednesday, 29 September 2021


Lemon Curd, made in a microwave in under 7 minutes!


An extra recipe for all lemon addicts. Never buy shop bought lemon curd again. Even if you are in a rush! My dear friend Pam, who lives in Hayle gave me this recipe, but I have no idea where she got it. I have been so grateful for all her wonderful recipes over the years. She was 92 this year and still cooks and bake like a pro.


The quantity below fills a 1lb jar and will keep a couple of weeks or so, in your fridge. As I took the photograph [ten mins ago] it was still hot and I scraped the basin to have a taste! Just perfect and as good as the traditional method. From start to finish, including grating the zest and juicing, it took me just under ten minutes.


A quick word on microwaves. These days they are getting more powerful and mine goes up to 1000 watt instead of 650 or 800 or similar. I turned mine down to ¾ power to compensate as I am sure the recipe would not cope with the extra power. It would be too hot. The recipe states use full power.


You will need a clean jar, sterilised. Place in the oven for a few mins. Plus a medium size glass bowl or basin.


2 large lemons, the zest and juice

3 eggs, well beaten

2 oz butter

8 oz caster sugar


In your bowl, melt the butter for about 1 min. Add the rest of the ingredients and beat together.

Cook on high [see above] for 1 minute - stir. repeat 5 times ie 5 times in all. Until it coats the back of a wooden spoon. 


That is it! Pot and then cover. I do hope you all give it a go, if you are a lemon addict like us! Nothing like it in the middle of a sponge, or on ice cream. This will be my go to recipe from now on.,


Sunday, 26 September 2021


Lemon Curd Surprise Coconut Top Hats


Beautiful, tasty, cup cakes with a lemon curd filling. [when did buns become cup cakes??] Easy Peasy to make and fill. Old fashioned they might be, but I like that. I adapted this from an old cookery book, given over with an oven and handed to me by a friend. Everyone knows I collect old books.


The quantity below makes about 15 or 16 large buns.


You will need a large muffin tin, lined with cases. Pre heat your fan oven to 160C


6 oz of softened butter

8 oz caster sugar

3 large eggs

7 oz plain flour

2 teaspoonfuls baking powder

pinch of salt

1 teaspoonful vanilla extract

4 oz desiccated coconut

6 fl oz buttermilk


In a medium bowl, cream together the butter and sugar, then add the eggs one at a time…. you all know the routine! Add the vanilla and the coconut, then beat in half the flour with half the buttermilk, mix well and repeat the the other half.


Spoon carefully into the cup cake cases, until about three quarters full. Bake until golden and firm to the touch, about 25-30 mins. Cool in the tin for a short while, then place on a wire rack and wait until cold.


Filling and topping


Good quality Lemon Curd - I used left over from the previous post.


vanilla butter icing [2 oz soft butter and 2 oz icing sugar, vanilla extract]


Using a small sharp knife, carefully cut around the centre of the top of the bun, making a little well and your top hat. Carefully leave the circular piece you have sliced beside each bun. Fill the wells with lemon curd, top with a dob of vanilla butter cream and place the top hats. Easy. Dust with a little icing sugar to finish off.


Yummo!!!


If you wish, you could use fresh whipped double cream. Also toast a little extra desiccated coconut to add to the cream, if you wish to add to the coconut theme. So many variations.


Sunday, 19 September 2021


Lemon Cake with homemade Lemon Curd filling


A twofer special, as I begin a series of posts, over the next month or so, featuring lemon! This is a totally delicious cake. No flour, no butter [in the cake]. Dead easy and with added whipped double cream, the most scrumptious dessert. Given to me by a cousin, it is now a firm favourite. The cake is just as good on the third day - not that it will last that long.


The Lemon Curd


Makes 2 medium size jars, store in your fridge when cold and use within two or three weeks.

I sterilised the clean jars in a oven for ten mins.


4 unwaxed Lemons - juice and zest

3½ oz butter

7 oz caster sugar

3 large eggs, whisked


Place a large basin over a pan of barely boiling water and add the lemon zest and juice, the sugar and the butter. Allow to melt, stirring now and then. When everything is melted whisk in the eggs and continue whisking until it is well combined. Watch the curd as after 6 or 7 mins it will thicken. Cook for a couple more mins then take off the heat and allow to cool before tipping into the jars. Just lovely and so much better than bought. You can add a little more sugar if you wish.


Note: I often have duck eggs and used these for the above.


LEMON CAKE


Lightly grease, then line a spring form 8 inch cake tin. Pre heat your fan oven to 170C


The zest of 3 large lemons, unwaxed if possible

4 oz caster sugar - in ½s

4 large eggs, separated

5 oz ground almonds

1 teaspoonful baking powder

1 teaspoonful white wine vinegar

½ teaspoonful salt

icing sugar for dusting, if not using cream


In a medium bowl, whisk the yolks, one ½ of the sugar and the zest. Add the ground almonds and BP and mix well.


In another medium bowl, start whisking the egg whites, then as it starts to get frothy, add the salt and vinegar. Continue whisking until soft peaks, then add the other half of the sugar and carry on whisking until fairly thick. Fold this into the almond mix then tip into your prepared tin and bake for about 30 mins until golden and firm to the touch.


Cool in the tin for a couple of mins then release the spring form clip and cool on a rack.


When cold, split and fill with some of the delish lemon curd and also some double cream if you wish. Whatever. Or leave it plain for a simple afternoon tea.


Sunday, 12 September 2021


Rhubarb and Ginger Fools


Well, over the summer, I have still been cooking and Fools are one of our family favourite summer desserts. But then, we think they are great any other time too. Plus Ginger and Rhubarb are a marriage made in yummy heaven. A very easy and make ahead dessert that is so delicious!


Makes 4 generous portions [or 6 wine glassfuls]


About 12 oz of fresh rhubarb [not stringy]

2-3 tablespoonfuls caster to taste [I used two]


Start the night before by thinly slicing your rhubarb and place it in a small saucepan along with the sugar and a tablespoonful water [no more] and simmer for about ten mins until just softened. Set aside, break up any larger bits and when cool tip into a small basin and chill, covered.


The next day….


300 ml tub of double cream

400 ml full fat Greek yogurt

2 tablespoonfuls of icing sugar

½ teaspoonful ground ginger

1 tablespoonful finely chopped crystallised ginger [plus a little extra for the top]


In a large ish bowl, place the cream, yogurt, sifted icing sugar and ginger then whisk until just holding its shape. I usually use a balloon whisk as it is so easy to over whisk. Good exercise anyway.


Stir in the chopped ginger, then carefully spoon though the chilled rhubarb, taking care to not completely stir in the fruit. You are looking for a marbled affect.


Pour into your serving dishes and lightly sprinkle over some more ginger. Enjoy!


Note: You can, at a pinch use fat free Greek yogurt, but it is not as good.


Sunday, 5 September 2021


Conference Cake


One of my favourite fruits are Conference Pears and the new season fruit are with us.

I also love making cakes with oil, they are always moist, and so easy. I chopped an extra smaller pear along with some demerara for a topping, or you could perhaps drizzle over some icing - whatever! Or just leave plain, cause it needs nothing really. I found this recipe in an old book someone gave me, knowing how much I love trawling through other folk’s cast offs!


You can make it in a conventional round tin, or a loaf tin. But I used a 10 inch square tray bake tin. 


You will need a tin of your choice, oiled and lined if using a larger round tin. Pre heat your fan oven to 160C


9 oz plain flour

8 oz golden caster sugar

½ teaspoonful baking powder

pinch of salt

2 large eggs

6 fl oz sunflower oil

1 teaspoonful vanilla extract or bean paste

2 medium-large size Conference pears, peel and chopped - not too small

2-3 oz of roughly chopped walnuts


In a large bowl, sift in your your ingredients, then making a hole in the centre, pour in the beaten eggs and oil. Mix well and stir in the fruit and nuts. Well, that was hard work - not! Yes, the dough is stiff, making allowance for the fruit to soften.


Tip into your prepared tin, level off the top and bake for about 50-55 mins, until firm to the touch and nicely golden. Less for a tray bake.


Cool before drizzling over some icing if using. Cut into squares, as I did if using a tray bake tin.


Note: Substitute walnuts for pecans or hazelnuts if you wish. Or why not sprinkle over some crystallised pears if you can find some.


Enjoy! This recipe is absolutely scrummy. Trust me.


Sunday, 29 August 2021


Crushed Pineapple Carrot Cake


I love baking with a can of crushed pineapple and combined with the ease of baking with oil, trust me, this is one of the easiest bakes!! Except for grating the carrots - hey ho, can’t have it all ways. But it is worth it. An old friend passed this recipe on to me some time ago and I kept forgetting to make it. Well, I wish I had before now. I made this for dessert after a Sunday roast.


You will need a 9 “ x 12 or 13” tray bake pan, not too shallow, greased. Line it with parchment, hanging plenty over the long ends to help you lift it out. Pre heat your fan oven to 160C


10 oz plain flour, sifted

1 heaped teaspoonful baking powder

large pinch of salt

1 teaspoonful cinnamon [a little more if you wish]

12 oz caster sugar

8 fl oz of rapeseed oil [or vegetable]

3 large eggs

1 teaspoonful vanilla extract or bean paste

1 can of crushed pineapple, drained as much as you can

8 oz of grated carrot

3 oz desiccated coconut


In a large bowl, whisk together the sugar, oil, eggs and vanilla until well combined then stir in the carrots, pineapple and toasted coconut. Then fold in the remaining dry ingredients. Mix well.


Tip into your prepared tin and bake for about 40 mins, until golden and firm to the touch. Cool in the tin for a short while, before lifting out, holding the long ends of the baking parchment. When cool…….


8 oz cream cheese

3 heaped  tablespoonfuls of icing sugar

a little grated lemon zest

2 oz desiccated coconut


Make a topping with the cream cheese, zest and icing sugar, then lightly spread it over the tray bake. Cut into square or slices. Sprinkle with the extra toasted coconut.


Yum yum. So very good. Very moist and the tropical flavour combinations are just perfect.


Note: I like to add some dried fruit to my carrot cake…. sometimes. Golden sultanas are good. 

It is also great if you lightly toast the desiccated coconut before using. Use a dry fry pan, tossing all the while until lightly browning.